Showing posts with label crafting. Show all posts

Sunday, December 12, 2010

Crafty with Peppermint

I Made This!


For mine and moms annual girl christmas party this year, we had a gift basket/bag exchange. I had decorated my box with peppermints(didn't think to take a picture) and found that I had A LOT left over. One evening I decided that I wanted a new festive,decorative item and came up with this. This project with cheap (already had glass jar and peppermints were $2 at store), easy and very festive.


Monday, December 6, 2010

cute towel apron


I had seen a similar picture of this cute apron posted on my moms wall in her sewing room and knew that I wanted to make one. We did not have a pattern, but fortunately, I have a very talented mother who was able to help me create this project.  I am happy to say that I did about 98 percent of the sewing and crafting involved.

I hope that the recipient of this cheerful gift will enjoy it.


Friday, September 10, 2010

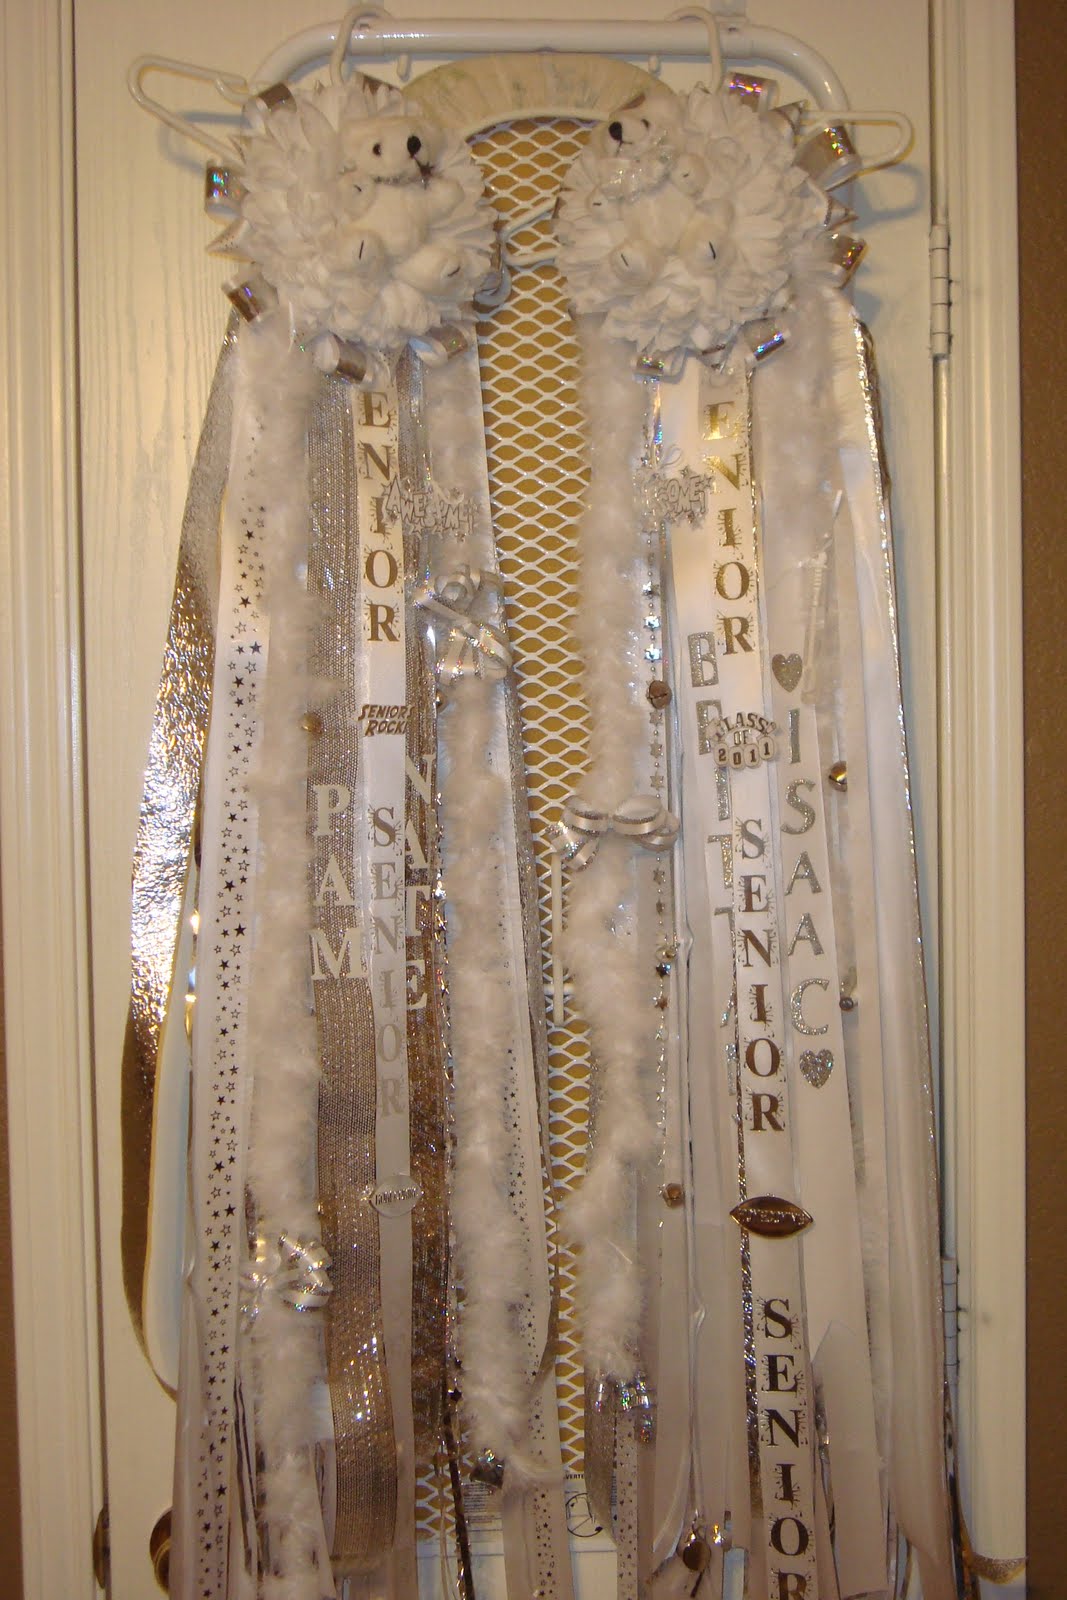
Sneak Peek-Mum making is done

Sneak peek to the two we made for Nathans and Isaac's dates
For those of you who do not live in Texas (maybe the South....I'm not quite sure), homecoming mums are a tradition. You can get anywhere from a small single mum all the way to a large triple mum. Some girls are happy with simple ones and to other girls the fuller, blingier the better. Some will parade them around cute while others will wear them like a sash. Most of the time, they are as big as the girls and you wonder how they don't tumble over.

Kim (Pam's mom) giving a sneak peek to Nathans
Now don't think that the boys are left out. They are not. The guys wear decorated garters on their upper arms.

Now this is a racket for the crafting industry. So wish I would have been the one to come up with the idea. Can you say CHA CHING CHA CHING! If the kids are to purchase them at school, the small ones start out  around $75.00. The highest priced one that I saw at Michael's Crafts was about $275.00.

I set up a mum making get together with a few friends to save some moola. I bought supplies to make two 3 1/2 ft mums. I spent somewhere around $100.00 for both.  Now I thought that I was being clever and had purchased my supplies early. Only to realize that I bought the supplies for an under classman and had to return everything for the senior silver and white.

Mom (Kim) showing off the one for Isaac
I had offered to make one of Nathans friends his to help save him some money. Mom thought the idea was neat so I enlisted her help. I am not quite sure she enjoyed it in the end. And then some of the ribbons and trinkets fell off and I had to redo it.....Lets say two large mums is too much for me. Sadly, Becky was unable to make it or I would have a picture of a large three mum.

the top part or the mum itself
This is the top to the ones that I made. Bears tend to be the typical item placed in the center. You can do other things instead, for example, Becky was placing a hat and some miniature mums on hers. Personal creativity is the key. I just happen to know that Pam will like the bear.

The one on the left is the one Nathan is giving to Pam. I may add some more silver stars to the bear. The one on the right is Isaac's that he will give to his girlfriend Brittany. She had requested light pastel green ribbon (not at all the theme or school colors), so I think that I will change out the white bow that the bear is holding for her request.

I am excited for homecoming, glad that Nathan has a date and hope that both the girls like them. I labored today to finish them and I am now officially mummed out.


Thursday, May 20, 2010

You know you have no life when...

...when you spend many many days playing on your blog. Well, its not that I have been posting...it is me trying to figure out how to become shabby. Wanting to do more than just write. Being curious as to how the backgrounds are made....wanting to figure out how to make buttons...getting caught up reading other SHABBY/AWESOME bloggers blogs. It is not that I don't have a life; I have just placed it on hold. Avoiding dishes, laundry, cleaning my floors or helping Nathan look for his missing retainer. My list of really having a life can go on and on. And quite frankly, I must try to resume it tomorrow as we are out of drinking water...and faucet water sounds and tastes very unappealing.

Sooooo....if you are one of these bloggers or readers that knows how to do this creativity...and you can tell me where to turn for creating signatures, cool tabs (where i can paste links to pictures, crafts, etc),  and making buttons..........PLEASE help me, so I can refocus on my life.

Wednesday, May 12, 2010

Another Picture Frame

I was cancelled from my shift tonight so I had decided to make another picture frame (as I had one left). Again my goal was to use supplies that I had on hand....here is my outcome.

Plain photo matte
Supplies used: scrapbook paper, craft flowers, sequins, rickrack ribbon,
cutting knife, glue stick and glue gun
I did not have any lettering that I liked...I might add that later
Final Product
Picture taken when Nathan was around 12 or 13 ( I think)

Monday, May 10, 2010

Easy Picture Frame Project

I have found that I have a  love for creative picture frames every time I hit the stores. Unfortunately, I am way to cheap to want to pay the price for these beauties that would hold my lovely memories. I have also came to accept that I have an addiction of buying scrapbook paper without doing much scrapbooking. My solution was a fun and easy picture frame craft that I did yesterday. Only supply that needed purchased was a basic picture frame for 8.99 ( an impulse buy as I did not shop around or wait for a sale like I would normally do). Here is my outcome:
                                                   
    Step #1 boring mat
Supplies used: paper of choice, blade for cutting, glue stick, cricut for lettering
(stickers can easily be used instead) and one sequin
Final outcome: custom frame for next to nothing